Painting interior doors is an easy and cost-effective way to refresh your home’s style. This guide walks you through choosing the right paint, prepping the door, and applying multiple coats for a flawless finish. You’ll learn when to sand, prime, and how to use brushes, rollers, or sprayers for the best results. With these tips, you can transform your doors with a smooth, durable paint job that enhances your space.
How to Paint Interior Doors

Before diving into the painting process, it’s important to understand the key factors that influence a successful interior door paint job. This includes choosing the right type of paint, preparing the surface properly, and selecting the best tools and techniques. Proper drying times, sanding between coats, and priming are also critical steps that affect durability and finish quality. In the following sections, we’ll break down each of these elements to ensure you get a flawless, long-lasting result.
What Kind of Paint do You Use on Interior Doors?
Picking the appropriate paint plays a crucial role in ensuring your interior doors look great and maintain their finish over time. There are many door paints available in gloss, semi-gloss, and matte finishes. Pro Tip: Semi-gloss and satin paints are often ideal for interior doors. They show fewer roller or brush marks compared to high-gloss finishes. For interior doors, we recommend water-based paints (acrylic or latex) because they:
- Dry quickly (typically within 3–5 hours between coats)
- Have low odor
- Clean up easily with soap and water
- Stay flexible over time, reducing the chance of cracking
- Retain their color without yellowing
Oil-based paints can provide a harder finish but require longer drying time (24+ hours between coats), stronger odors, and special solvents for cleanup. For more information, check out our article comparing oil-based and water-based paints.
Best Interior Door Paint Brands and Their Gloss Levels
- Behr Premium Plus Interior Semi-Gloss Enamel – Semi-Gloss – Water-Based (Acrylic)
- Benjamin Moore Advance Interior Paint – Semi-Gloss or Satin – Water-Based Alkyd (Hybrid)
- Sherwin-Williams ProClassic Interior Acrylic-Alkyd – Semi-Gloss or Satin – Water-Based Alkyd (Hybrid)
- Valspar Cabinet & Furniture Paint – Satin or Semi-Gloss – Water-Based (Acrylic)
- Rust-Oleum Painter’s Touch Ultra Cover – Semi-Gloss – Oil-Based
- Zinsser Cover Stain Interior/Exterior – Satin – Oil-Based
- INSL-X Cabinet Coat – Satin – Water-Based Acrylic Urethane
What is the Best Method to Paint Interior Doors?
The best methods for painting interior doors are using a paint sprayer or a roller. A paint sprayer offers quick and easy coverage, while using a roller helps dark colors cover more effectively.
Should I Use a Brush or Roller to Paint a Door?
For the best results when painting an interior door, it’s best to use both a brush and a roller. A roller allows you to paint the flat areas of the door quickly and without leaving streaks. A brush is ideal for painting the edges, grooves, and any areas the roller can’t reach.
Do you Have to Sand Interior Doors Before Painting?
If you’re painting a door that has never been painted and already has a matte surface, sanding is usually not necessary. However, if the door has a glossy or slick finish from a previous coat of paint, it’s a good idea to lightly sand it before painting. A 200-grit sandpaper is sufficient for lightly scuffing the surface.
Should I Prime an Interior Door Before Painting?
Using a primer before painting interior doors is highly beneficial. On doors that have never been painted, primer helps seal the surface and prevents the paint from soaking in, saving you paint in the long run. If the door’s surface is glossy, using a primer will help the new paint stick better. It also makes it easier to cover up dark or bold colors from the previous coat.
Can You Just Paint over Interior Doors?
If the door’s previous paint is matte or satin and there is no peeling, you can paint it without priming or sanding—as long as you use a high-quality door paint.
How do You Paint an Interior Door
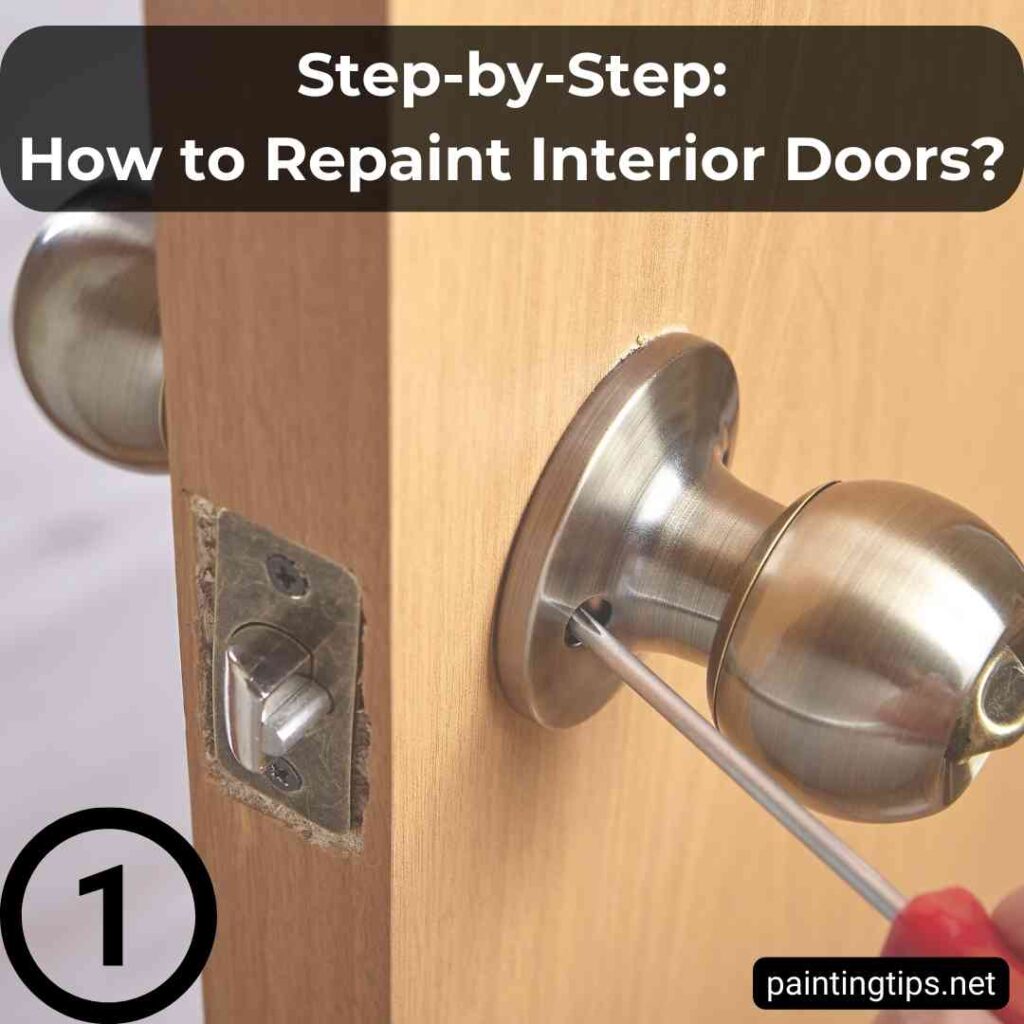
Step 1: Remove or Cover the Door Hardware
For the best results, start by removing all hardware from the door. Unscrew and take off doorknobs, locksets, and plates, then store the screws and other components in a labeled bag to keep them organized. If removing the hardware isn’t an option, carefully cover it with painter’s tape to protect it during painting.
Step 2: Decide Whether to Remove the Door
You have two options: leave the door hung or remove it. Leaving it hung is easier but requires careful painting around the hinges, while removing it allows for better access but needs more space and assistance. If removing the door, place wooden shims underneath for support and rotate it for even painting. If keeping it hung, use painter’s tape to protect the hinges and wedge the door open with a doorstop to prevent movement.
Step 3: Clean the Door Thoroughly
Wipe the entire door with a damp cloth to remove dust and grime. For greasy or heavily soiled doors, use a mild detergent solution. Make sure the door is fully dry before you start painting.
Step 4: Sand the Door (If Necessary)
Sanding helps paint adhere properly. For glossy or semi-gloss doors, lightly sand the surface. If the paint is peeling, remove loose paint and smooth the edges. For new, unfinished doors, sand to eliminate mill marks or rough spots. Use 180-220 grit sandpaper, sanding in the direction of the wood grain.
Step 5: Fill Any Holes or Imperfections
Apply wood filler to any dents, holes, or damaged areas and allow it to dry completely according to the product instructions. Once dry, sand the filled areas until they are flush with the door surface. Be sure to remove any dust before proceeding with the next steps.
Step 6: Apply Primer
Primer creates an optimal surface for paint adhesion. For unpainted doors, always use a primer. For painted doors changing colors, especially when transitioning from dark to light, applying primer is essential. If the door is in good condition and you’re using the same color, you may skip the primer. Apply primer using a roller on flat sections and a brush for detailed areas, working in the direction of the wood grain or panel design. Allow the primer to dry completely, preferably overnight (minimum of 5 hours).
Step 7: Apply the First Coat of Paint
For paneled doors, follow this sequence for the best results: start by painting the recessed areas of the panels, then paint the horizontal rails, followed by the vertical stiles, and finish by painting the edges of the door.
For flat doors, use a roller for the main surfaces, working in sections, and a brush for edges and detailed areas. Make sure to keep the edge of the painted area wet as you work to avoid visible overlapping marks. Related article: How to avoid paint roller streaks.” Pro Tip: For a smoother finish, thin strokes are better than heavy application. Applying two thin coats when you paint a door will always give better results than one thick coat.
Step 8: Allow Proper Drying Time
Patience between coats is essential for achieving a professional finish. For water-based paint, wait at least 4-5 hours between coats. For oil-based paint, allow 24 hours of drying time between coats. Keep in mind that environmental factors, such as humidity and temperature, can affect drying times. See our related post on the ideal drying times between paint coats.
Step 9: Lightly Sand Between Coats (for oil-based paint)
For the smoothest possible finish, once the first coat is completely dry, lightly sand with very fine sandpaper (220 grit). Wipe away all dust with a tack cloth before applying the second coat. This step is especially helpful for oil-based and high-gloss paints because it creates a smoother, more professional finish.
Step 10: Apply the Second Coat
The second coat is crucial for achieving a uniform, durable finish. Follow the same painting sequence as the first coat, paying special attention to any areas that appear uneven. Apply the paint with smooth, even strokes, ensuring consistent coverage across the entire door. For water-based paints, wait about 4 hours between coats. For oil-based door paints, allow up to 24 hours before applying the next coat.
Step 11: Final Inspection and Touch-ups
After the second coat has dried for at least 24 hours, inspect the door in good lighting for any missed spots or imperfections. Apply touch-up paint as needed and allow it to dry completely.
Step 12: Reinstall Hardware
Wait at least 24-48 hours after the final coat before reattaching hardware. Carefully remove all painter’s tape, then reinstall doorknobs, plates, and other hardware. Make sure all hardware functions properly after installation.
Materials Needed
Gather these supplies before starting your project:
- Paint: One liter covers approximately two doors with two coats .(5 liters for 10 doors)
- Primer: About half the amount of your paint quantity. (2.5 liters for 10 doors)
- Small, short-nap roller (3.9-inch/10cm): Provides smooth coverage on flat door surfaces.
- Angled paintbrush (2-3 inch): For detailed areas and edges.
- Painter’s tape: Protects hardware, hinges, and walls.
- Drop cloth or plastic sheeting: Protects flooring.
- Sandpaper (180-220 grit): For surface preparation.
- Paint tray and liners: For neat, controlled paint application.
- Screwdriver: For removing door hardware.